This is a comprehensive guide for troubleshooting and explaining the most common errors occurring while shooting and processing black-and-white or color-negative film. Errors in film development and processing can lead to your images being ultimately lost. Knowing what caused the issues and working to prevent them in the future can avoid many unpleasant surprises.
Feel free to share, save or print this guide if you found it helpful.
How to use this guide
This guide is separated into several sections, which will help you narrow down the search for potential root causes of your problems. Each section contains example images of the developing, scanning, or usage-related problem and quickly describes the problem and how to recognize it. We’ll explain what could be the potential cause of the problem and offer solutions on how to fix it.
Why you should always keep your negatives
Another important thing I recommend is to always keep your negatives. Make sure to always request them from your lab as well. In case you are developing your films via film processing envelopes at photo centers like Walmart or CVS you should clarify this question with an employee beforehand as most of the big retailers have stopped offering this service. Keeping your negatives makes troubleshooting a lot easier and it will help you to determine more accurately what is the cause of your problem.
Why did my film turn out blank, clear, or orange? (no visible edge markings)
Your film negative turned out to be completely blank, with no images and no edge marking visible at all, not even faint images. To recognize and determine this problem it is helpful to have your negatives at hand so you can check if the edge marks are visible or not. Without the negatives, it will be hard to determine whether the issues were caused during the film development process or not.
Note: Check if your film should have edge markings by default, some films such as Fomapan do not have them at all
Potential causes and how to fix them
- for B/W: Usually, the film was first processed in water or fixer instead of the developer.
- For color film: Usually, the film was first processed in Bleach/Fix instead of the developer.
- The developer is already extremely dead and unusable. (due to overheating or long storage time for example)
Make sure to closely pay attention when mixing up your chemistry and always visibly label your bottles to avoid mixing them up. I recommend positioning them in the right order before starting the development process.
If your developer has been already sitting for a couple of months and you are unsure whether it is still good to use, you should test it before developing a complete roll. To do so, just snip off the film leader of your undeveloped roll, drop it into your developer for a couple of minutes and it should turn completely black. This will tell you that the developer is still active. To also test your fixer, drop the leader into the fixer afterwards, if it still works your negative should go completely clear.
Why did my film turn out blank, clear, or orange? (edge markings are visible)
The film itself shows no images at all, but the manufacturer’s edge signing is visible. (Usually product and image numbers). When scanning this film it will be completely black without faint ghost images or anything similar.
Potential causes and how to fix them
- The film was loaded incorrectly and it was not possible to advance which resulted in unexposed frames
- The lens cap was not removed from the camera
- The film was not caught up in the take-up spool and could not be transported
Be very careful when loading film into your camera, as most of the time this issue is caused by incorrectly loaded film. Make sure that the take-up spool grabs the film leader and then shoot a minimum of two shots while advancing the camera. This way you probably won’t be able to squeeze 37 or 38 shots into one roll, but you can be sure that you will not completely waste the other 36 shots.
Make sure that you always remove the lens cap before shooting. Especially for rangefinders, where you won’t notice the black frame while checking the viewfinder, this can be a problem.
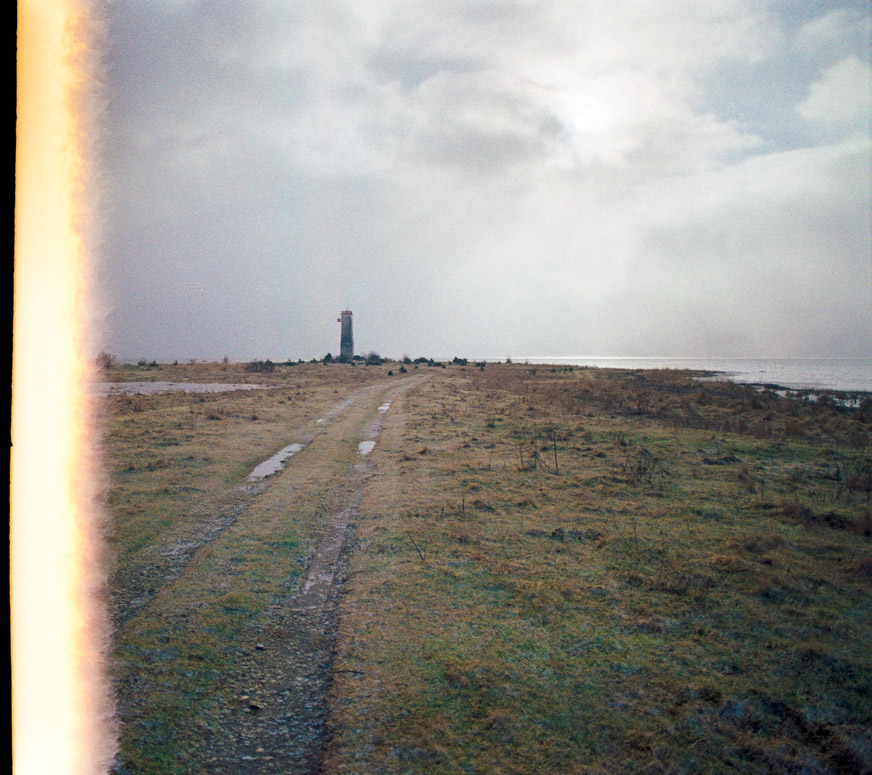
Why does my image have bursts of white/red/orange/yellow colored fog or streaks in it?
This problem is called light leaks and is an issue that most film photographers will encounter sooner or later. Light leaks are also often used as a stylistic element to give the picture more character and uniqueness, this practice is especially common in the Lomography movement. Most photographers however try to avoid light leaks at all costs. As the name suggests the problem is caused by light that accidentally enters the camera and exposes a piece of the film more than it should, this can be caused by different reasons.

Potential causes and how to fix them
- Bad or missing light seals
- Accidentally opening the back of your camera
- The developing tank has leaks
- Incorrect processing during development
Damaged and worn-out seals are the most common problem, they will deteriorate over time and cause more and more light to fall into the camera, check the edges of your camera back and you should easily be able to notice crumbling seals. You can get new matching light leaks for your camera or just order a big piece of foam rubber to cut them on your own. I replace the light seals on every used camera I buy just to be on the safe side.
Light leaks can also be caused by opening the camera back or improper film loading, be careful to not create gaps or openings while loading your film. If you notice that your leaks are not related to the camera used or incorrectly loaded film, the problem probably happens during development and is caused by a development tank with leaks.
Why does my image look dark/faded/grainy with low contrast?
Underexposed images have a very certain look, they are grainy, have a very low contrast with washed-out colors, and just feel muddy. Digitizing your images will make this even more visible as the scanner will try to bring up the shadows in order to make the details more visible which will ultimately result in further decreasing the image quality.

Potential causes and how to fix them
- Incorrect metering or defective camera meter
- A low battery or wrong battery on your meter
- Wrong ISO settings in the camera
- Expired film
If you are solely depending on the camera meter I recommend getting a dedicated light meter to verify the lighting conditions by always metering for the shadows and comparing with your built-in meter. For quickly checking if the current exposure makes sense you can also make use of the sunny 16 rule.
Always make sure to set your camera to the correct ISO setting that matches the film’s box speed. Note that expired film behaves differently.
Analog film does not handle underexposure too well, so I always aim to rather overexpose than underexpose. Correcting overexposure in post usually looks a lot better than trying to fix underexposure.
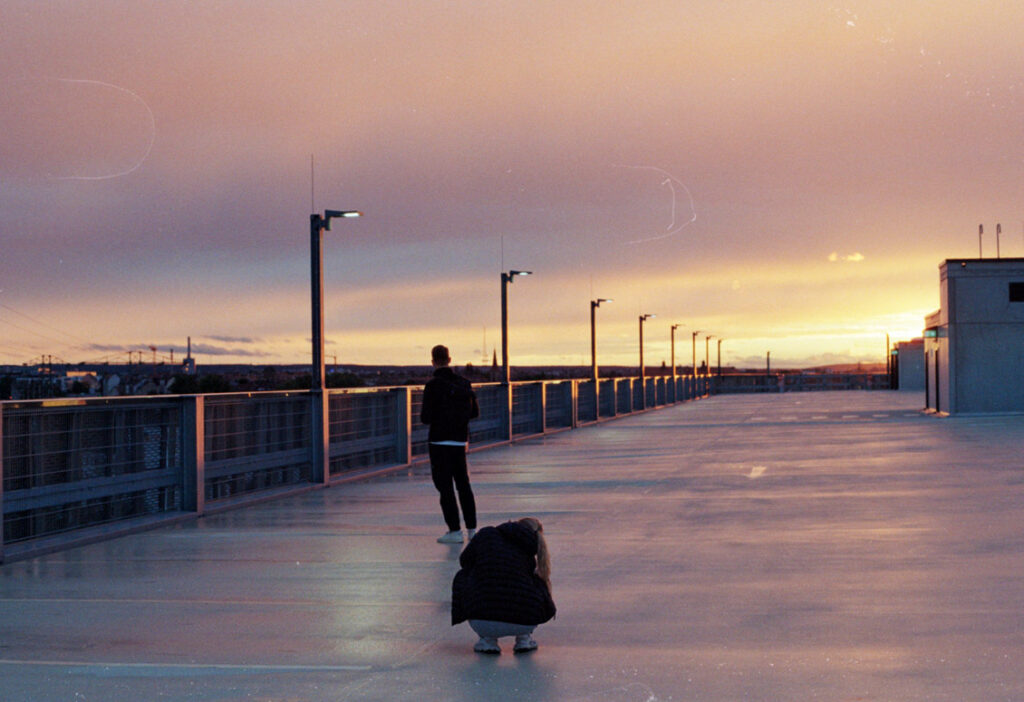
Why does my image look too bright/flat/blown-out/dull with low contrast?
Overexposing your image is on the other side of the spectrum, but it rarely happens. Most film handles overexposure very well, and some look a lot better when purposely overexposed. Correcting overexposure is a lot easier and you have a lot more details to work with in post-production so this is rarely an issue, but occasionally happens.
Potential causes and how to fix them
- Incorrect metering or defective camera meter
- A low battery or wrong battery on your meter
- Wrong ISO settings in the camera
Overexposure can have similar issues like underexposure, make sure to double-check your camera’s settings as well as your ISO values, use the sunny 16 rule to quickly verify your metering and always check whether your built-in light meter is taking its values from the correct focus point within the frame.
Why do I see multiple exposures in one image?
Shooting multiple exposures is a great artistic tool in film photography that usually happens with intention. However, if you just got your freshly developed film from the lab and the images are mixed together where you would not expect it, there seems to be a problem somewhere in your system.

Potential causes and how to fix them
- This problem should always be related to the camera advanced mechanism of your camera
Maybe you accidentally pushed the rewind button or you shot the same role twice, but this problem always has to do with your film advance mechanism. Take a close look when shooting your next troll with this camera and check if the problem occurs again.
Another thing that happens quite often is accidentally shooting the film twice. If you plan to shoot the whole roll again you would only rewind until the film leader is still visible. Storing your exposed shot away and not marking it properly could cause you to reshoot the whole roll without knowing that it has been already exposed.
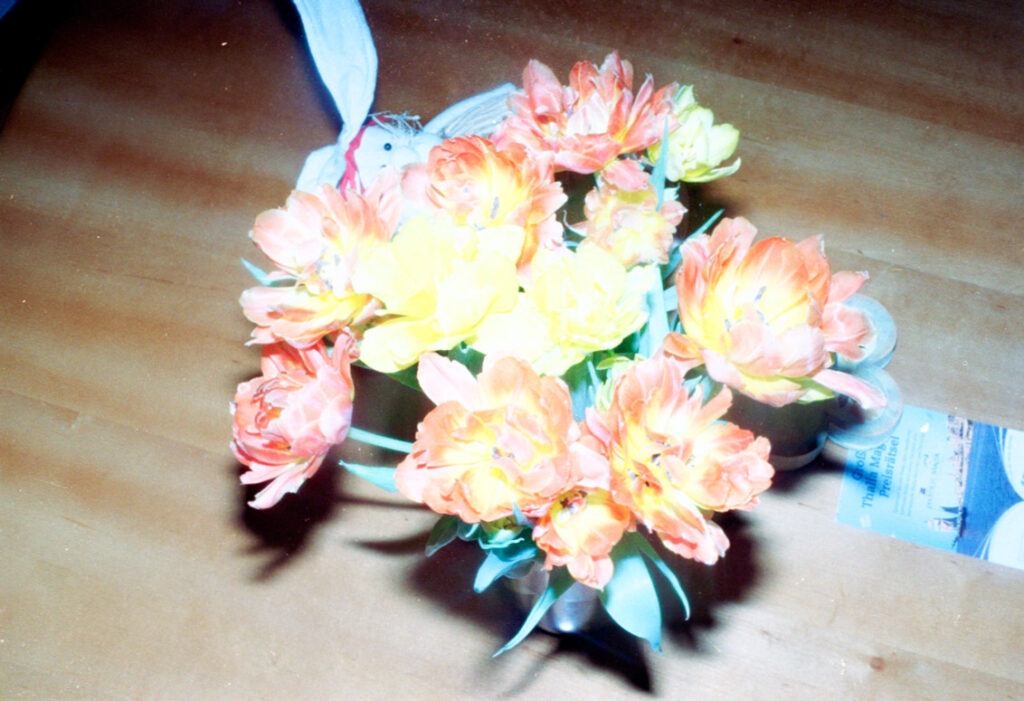
Why is my frame only half exposed/half blank?
Half frames always happen at the beginning of your role. The image will only be partly visible sometimes only half of it, sometimes only 1/4 of it. The cut where the image stops will look kind of burnt. Some people like these shots, and some avoid them at all costs. Let’s take a look at what the reason for this “effect” is.
Potential causes and how to fix them
- You did not advance the film far enough before starting your new roll
The reason why this happens is that part of the film was already outside of the cartridge and exposed to the light which is why it will turn completely white (black on the negative) after scanning. While loading your camera you will have to pull the film leader out, make sure the take-up spool securely grabs the film leader, and advance it a couple of times with a closed back. Usually, the frame counter starts with an “S”, a “0” or a dot and you have to fire the camera 2 – 3 times to get through the unusable, already exposed frames, until it will show frame number “1” and you know you have reached the usable part of the film and your image won’t be half ruined.
If you just start shooting right away without winding past the first couple of frames then you may receive a half frame like in the picture shown above. Film manufacturers take the first unusable shots into account and they will be labeled with zero on the negative, so you can be sure to still have 36 to go after winding through the first ones. But the other way around, if you can manage to lose as few as possible of the first shots you might manage to squeeze 37 or 38 shots out of a roll.
I do actually like the first frames, I just always make sure that I do not shoot anything important with them or I shoot the same image twice to be on the safe side. One or two additional photos are also a nice benefit. If you also find these images appealing, check out the Instagram account f1rstoftheroll for more inspiration.
Why do my negatives and images have a wavy pattern across the entire roll? (X-Ray Damage)
Your images look overexposed and washed at some spots, this type of damage has a very recognizable pattern that is visible across the complete roll of film as well as in the scanned images.
Potential causes and how to fix them
- This effect is caused by X-Ray damage, the film has been exposed to electromagnetic radiation in some form
- X-Ray damage usually happens while traveling via plane with film
X-ray scanners that are used to inspect your carry-on luggage usually use a very low level of x-radiation, so it shouldn’t be a problem to get your film scanned one or two times. In fact, I have had rolls that have been scanned a lot of times more, without any noticeable damage. However, the x-ray scanners that are used to scan your checked luggage operate with a lot higher energy x-rays, so you should avoid putting any film rolls or loaded cameras into your checked bags at all costs. This is the general advice that I’m following and I never had any problems, but if you want to be on the safe side, take the following precautions:
- Request a hand check of your unexposed rolls, especially when going through multiple x-rays, most flight regulations allow hand search in such cases. (see US FFA regulations for example)
- Get your rolls developed locally before flying
- Do not trust lead-lined bags for reducing the x-ray damage. Their effectiveness depends on the intensity of the x-ray, and as the bags often trigger additional inspections anyway I would try to avoid them at all
- Get your film shipped by a specialized carrier
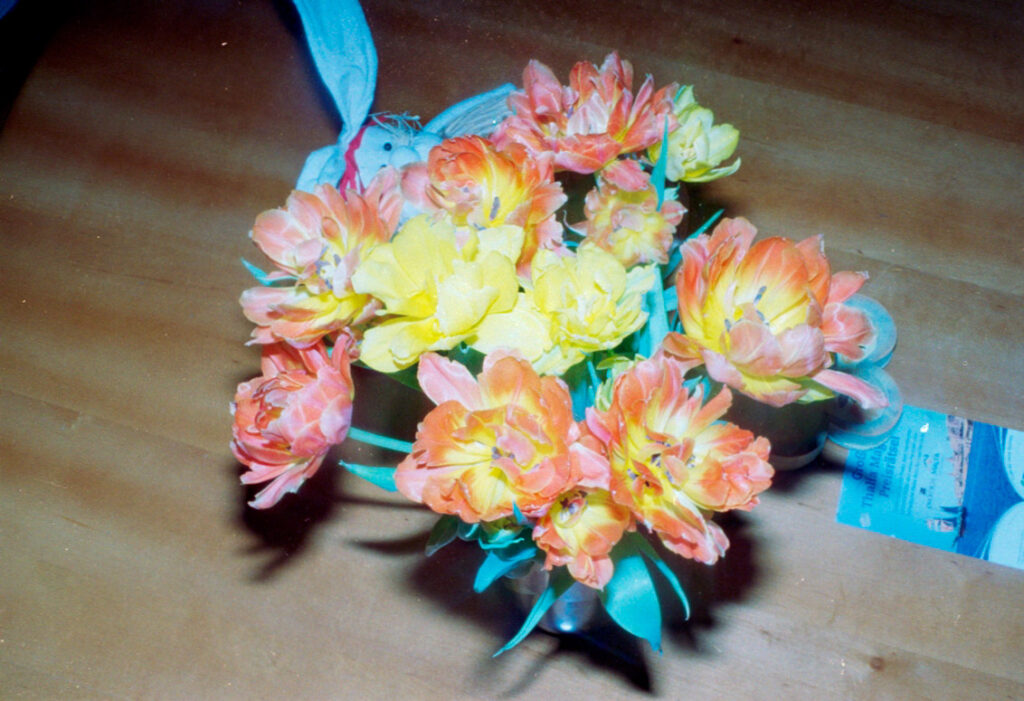
Why is my film roll not transparent after developing (Fixing issue)
Your developed or scanned negatives look cloudy, milky, or milky-pink. Your negative will not look completely transparent which indicates that your film has not been fixed correctly. Being able to check the negative helps to determine the error more precisely.
Potential causes and how to fix them
- Insufficient level of fixer
- your fixer is already exhausted, too old, or has been stored incorrectly (too much heat for example)
- Your chemicals have been mixed incorrectly (too diluted)
In order to avoid this, always mix exactly according to the manual, and make sure to test-fix a small snip of the film before developing the whole roll. Especially with black and white films it is important to check the specific fixing time for the film, this can differ from film stock to film stock.
With color film (mostly C41) you usually should stick to the development recommendations. Also, note that over-fixing is not possible, so adding a bit more time to your fixing period won’t do any harm.
If your developed roll is not fixed correctly it is easy to troubleshoot, just put it back into the fixer (or blix) and wait for some minutes, if it still comes out unclear or won’t clear at all, your fixer is definitely exhausted and you need to mix a fresh one.
Avoid this error by:
- Using fresh fixer to be on the save side
- Use enough fixer to cover the whole roll of film
- Always check fixation times and stick to them
- Check and refix if needed
Why do I see drying marks on my developed negatives and scans?
Drying marks are differently shaped, kind of round spots on the surface of the negative. You can easily spot them, when using a flashlight to check on your drying negatives, they become unmissable when scanning the film. The marks are caused by droplets of water when drying and are usually visible on the shiny front side of the negative but can also appear on the emulsion side.
Potential causes and how to fix them
- The area you are living in has very hard water, this will make drying marks a lot more likely and apparent to see on the images
- The water is leaving minerals behind when evaporating
The first step you should take in order to avoid drying marks is to use distilled or de-mineralized water. This way you can avoid the watermarks caused by minerals such as calcium and magnesium that are typically found in tap water. Depending on the price and availability in your location you can use it for the whole rinsing and developing process, but as this could get pretty expensive real quick I always recommend using it only for the final rinse.
Using a wetting agent like Photo Flo will break the water-surface tension and help minimize water marks and streaks on your negatives. You will only need a very small drop of wetting agent, so one bottle will last for ages.
Another option is to use a squeegee to get rid of any watermarks before hanging your film to dry. Using a squeegee is a pretty controversial topic among film photographers, some people would never touch their freshly developed film with anything at all while others swear by wiping the film with a squeegee. In the end, it comes down to personal preference.