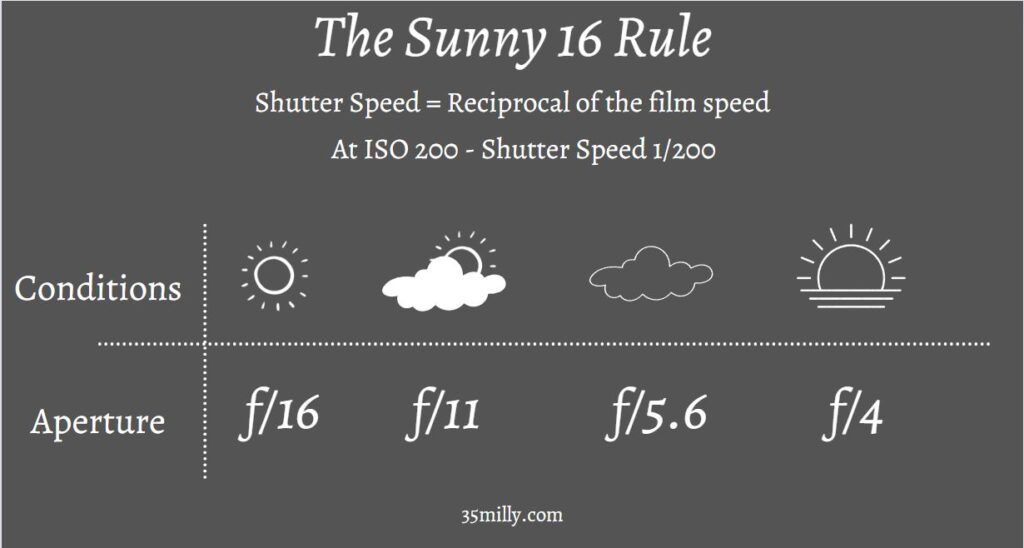
Before the shift to digital photography took place, the Sunny 16 Rule or also called the Sunny f/16 Rule was one of the everyday essentials for film photographers. In the time of cameras without an exposure meter and no external measuring device with you, you could easily expose your film correctly by implementing this rule.
But even today this rule will still be helpful for you, let’s say you want to take pictures in manual mode using your DSLR. The sunny 16 easily enables you to take a first approximation picture on which you can build. The rule also helps you to understand and internalize the interaction of light, aperture, ISO, and shutter speed.
So what exactly does the rule say?
The basic rule is that on a sunny, clear day at f/16, the shutter speed must be the reciprocal of the film speed.
For example, if you have a film with ISO 200 on a sunny day, the shutter speed at f/16 must be exactly 1/200 to get a correct exposure of the film. If your film had ISO 400, the shutter speed would be 1/400, and so on. Film cameras usually do not have freely adjustable shutter speeds, so one would always select the closest one here.
Why is the Sunny 16 rule so useful?
You’re probably thinking, why should this be so useful? Because as soon as the weather is not clear and sunny, but cloudy or rainy, the rule no longer applies and if you want to create a certain depth of field effect with a different aperture setting, for example, it can no longer be applied. That’s true, but by making use of this rule, you have a perfect starting point to calculate or simply estimate how the settings have to be adapted to the circumstances.
Another advantage of the Sunny 16 is the type of light measurement because, in contrast to the built-in exposure meter of your camera, this method measures the incident light and not the reflected light. In this type of measurement, the values remain constant under the same lighting conditions, the Sunny 16 is not deceived by a black pullover or a white wedding dress, for example. So if the value displayed by the exposure meter seems strange to you, you can easily use the Sunny 16 rule in difficult lighting conditions to verify the exposure.
What to do with a different shutter speed or exposure?
Let’s suppose you want to take a portrait on a sunny, cloudless day and you want to create a particularly shallow depth of field effect for this reason. According to the rule, with ISO 100 at f/16, you would choose a shutter speed of 1/100 (on a film camera 1/125 since 1/100 isn’t usually available). But actually, you want to choose an aperture of f/4 to achieve a nice depth of field, as a result, the picture would be extremely overexposed.
In order to correct the exposure at aperture f/4, and to compensate for the overexposure, you now have to halve the shutter speed for each f-stop. Say from f/16 to f/4 the difference is four f-stops, you reduce the shutter speed from 1/125 to 1/2000 to compensate for the overexposure (four halves). The changes in the variables are again clearly shown in the table below.
| Aperture | Change of shutter speed | Shutter speed | Change of shutter speed |
| f/16 | 0 | 1/125 (ISO100) | 0 |
| f/11 | +1 stop | 1/250 (ISO100) | -1 step |
| f/8 | +2 stop | 1/500 (ISO100) | -2 step |
| f/5.6 | +3 stop | 1/1000 (ISO100) | -3 step |
| f/5 | +4 stop | 1/2000 (ISO100) | -4 step |
Of course, it also works the same way if you have the shutter speed as a priority, so if you want to photograph a moving subject such as children, animals, or sports, the shutter speed of 1/125 at f/16 is clearly too slow. So you halve the shutter speed twice to 1/500 and open the aperture by two stops to f/8 and you can expose the image correctly again. The same applies to implementing it in the other direction.
What do I do if the initial weather situation is different?
Of course, you don’t always have blue skies and blazing sun (rather bad conditions for good pictures anyway). But this can also be compensated for by adjusting the aperture to the weather. The advanced rule is as follows.
| Aperture | Lighting conditions | Shadowdetail |
| f/22 | Snow/Beach | Dark with sharp edges |
| f/16 | Sunny | Distinct |
| f/11 | Slight overcast | Soft around edges |
| f/8 | Overcast | Barely visible |
| f/5.6 | Heavy overcast | No shadows |
| f/4 | Open shade/Sunset | No shadows |
| Add one stop | Backlighting | – |
So now you actually have all the basics to be able to photograph as you like in any initial situation, even without exposure metering. Based on these f-stops, the same rule applies as above, aperture and shutter speed can be compensated for one another in order to achieve the desired end result. If you can’t remember everything here: Always have a cheatsheet at hand.
Make it even easier
If all this is still too much to remember and too complicated for you, you can have it even easier. Simply download one of these apps from the Playstore or Appstore and your smartphone will do all the calculations for you.